[Sammelthread] ASUS B550 Strix/TUF/Prime Series Sammel- und Laberthread

ASUS B550 Sammel- und Laberthread
Reviews & VRM Info | UEFI Download | Q&A


B550 Strix Serie
550i.jpg
550e.jpg
550fwifi.jpg
550f.jpg
550a.png
Strix B550-I Gaming
Produktseite
Spezifikationen
Downloads
Handbuch
Preisvergleich
USB Flashback:
BIOS Mod
Strix B550-E Gaming
Produktseite
Spezifikationen
Downloads
Handbuch
Preisvergleich
USB Flashback:
BIOS Mod
Strix B550-F Gaming Wifi
Produktseite
Spezifikationen
Downloads
Handbuch
Preisvergleich
USB Flashback:
BIOS Mod
Strix B550-F Gaming
Produktseite
Spezifikationen
Downloads
Handbuch
Preisvergleich
USB Flashback:
BIOS Mod
Strix B550-A Gaming
Produktseite
Spezifikationen
Downloads
Handbuch
Preisvergleich
USB Flashback:
BIOS Mod


B550 TUF Serie
tuf550pro.png
tuf550pluswifi.jpg
tuf550plus.jpg
tuf550mpluswifi.jpg
tuf550mplus.jpg
TUF Gaming B550-Plus Wifi
Produktseite
Spezifikationen
Downloads
Handbuch
Preisvergleich
USB Flashback:

TUF Gaming B550-Plus
Produktseite
Spezifikationen
Downloads
Handbuch
Preisvergleich
USB Flashback:
BIOS Mod
TUF Gaming B550M-Plus Wifi
Produktseite
Spezifikationen
Downloads
Handbuch
Preisvergleich
USB Flashback:
BIOS Mod
TUF Gaming B550M-Plus
Produktseite
Spezifikationen
Downloads
Handbuch
Preisvergleich
USB Flashback:
BIOS Mod


B550 Prime Serie
550plus.jpg
550mawifi.jpg
550ma.jpg
550mk.jpg
Prime B550-Plus
Produktseite
Spezifikationen
Downloads
Handbuch
Preisvergleich
USB Flashback: X
Prime B550M-A Wifi
Produktseite
Spezifikationen
Downloads
Handbuch
Preisvergleich
USB Flashback: X


Q&A
  • Alternative Lüftersteuerung
    Argus Monitor (30 Tage kostenlos) - Download Herstellerseite
    Man kann bis zu 7 Punkte pro Lüfter variabel einstellen.
  • LAN Verbindungsprobleme
    Wenn vorhanden probeweise den USB DAC Treiber deinstallieren
    Intel I225 2.5Gb Chip Stepping 2 Verursachen Probleme.
    Welchen Chip habe ich? Gerätemanager > LAN Chip Eigenschaften > Details > Hardware ID > Oberste Zeile endet mit _01 (Revision 1) _02 (Revision 2) _03 (Revision 3).
    Lösung: An Asus Support wenden, Problem schildern und ggf. um ein Austauschboard bitten. Alternativ eine PCIe LAN Erweiterungskarte nutzen.​
  • Sound setzt aus oder knistert
    Meistens tritt dieses Problem auf, wenn man einen hohen RAM Takt verwendet. In diesem Fall kann man versuchen die SOC Spannung auf 1.125V zu erhöhen. Sollte das nicht ausreichen, zusätzlich noch die VDDG CCD Spannung auf 1.00V (oder niedriger), sowie VDDG IOD Spannung auf 0.925V stellen.
  • USB Disconnect
    Mit bestimmten UEFI/Agesa Versionen (v2 1.1.0.0/ 1.1.8.0) können sporadische USB Disconnects auftreten. Um dies zu umgehen bitte folgende Einstellung im Bios deaktivieren:
    UEFI -> Advanced -> AMD CBS -> Global C-States deaktivieren
    => Mit AGESA 1.2.0.1 Patch A wurde das Problem angegangen und sollte bei vielen die Probleme lösen.
  • Chipsatz Temperatur zu hoch?
    Unter "Onboard Devices Configuration" die vorhandenen Steckplätze (PCIe X16, X1, M.2, SB Link) manuell auf PCIe 3.0 umstellen, sofern man keine PCIe 4.0 Karte verwendet. Bei Auto Einstellung wird automatisch PCIe 4.0 angelegt, was zu einer höheren Last führt. Bei eventuell vorhandenen MOD Versionen kann man zusätzlich den ASPM Support aktivieren
  • Kann ich ein altes Bios Profil mit einer neuen Bios Version nutzen?
    Nein, es ist zu empfehlen kein altes Profil mit einer neuen oder älteren Bios Version zu nutzen. Dies endet meist mit einem Blackscreen. Nach jedem Bios Flash bitte die Einstellungen neu vornehmen. Selbst wenn sich ein Profil laden lässt, kann es trotzdem zu Instabilität führen.
  • BIOS/UEFI Downgrade
    Ein UEFI Downgrade ist ohne Probleme mit USB Flashback möglich, soweit vorhanden.
  • USB Flashback funktioniert nicht
    Bitte folgende Punkte ausprobieren:
    - Datei richtig umbenannt? Vorzugsweise mit dem im BIOS Download enthaltenen Renamer
    - Vor dem Flashen das BIOS auf Werkseinstellungen zurück setzen!
    - Einen anderen USB Stick ausprobieren. Vorzugsweise ein USB 2.0 Stick
 
Zuletzt bearbeitet:
Wenn Du diese Anzeige nicht sehen willst, registriere Dich und/oder logge Dich ein.
Ich habe nach 2 Jahren mein ein halbes Jahr benutztes TUF B550M Plus aus dem Dornröschenschlaf geholt, installiert war BIOS Version 2803

Mit meinem 5950X und meiner 7900XTX gebootet ohne Probleme, top.

Dann mal über das BIOS das Update auf das aktuelle 3607 versucht, schöne Bootloop der Status-LEDs, nie bis zu einer Bildschirmausgabe gekommen.

Also das erste Mal in meinem Leben das Flashback-Feature (mit einem USB 2.0 Stick) ausprobiert.

TL;DR: Die höchste BIOS-Version die ich installiert bekomme, ob mit Flashback oder aus dem BIOS, ist 2816. Bei 4 getesteten anderen darüber kommt es zur beschriebenen Bootloop.

Laut Foren scheine ich in der Geschichte der Asus B550-Boards nicht ganz der Einzige mit solchen Bootloops zu sein, aber die meisten konnten irgendwann 3002 installieren und hatten keine Probleme mehr.

Hat noch jemand Erfahrungen/eine Idee was ich machen kann, außer das Board jetzt halt mit der veralteten BIOS-Version zu Ende zu nutzen?
 
Gibt es noch andere vertrauenswürdige Quellen für gemoddete BIOS für ASUS Boards (und in meinem Fall auch das TUF B550-Plus)?
Bist du fündig geworden die suche ich nämlich auch?
Beitrag automatisch zusammengeführt:

hi mein guter,

wärst du so lieb und würdest für das

ROG STRIX B550-F GAMING (WI-FI) BIOS 3202

wieder deinen MOD drüber bügeln? oder GIbts evtl eine Anleitung wie ich es selbst tun könnte?

LG und besten Dank
HI hast du die älteren MOD versionen?
kannst du mir die geben?

Danke
 
Ich vermute die MODS vom bios wurden damit erstellt:
 
ich hab noch kein plan ob ich "Suppress If" die auschalten muss oder "Acess Level" nur ändern:unsure:, ich hab einfach mal meine Bios Daten angehängt viel leicht weis es ja jemand ;)


1713908728578.png


Anleitung:
1713909013444.png


Lost_N_Bios Post:
On editing the setup PE32, I don’t know how to edit for this issue to fix either, this error is not same as the others you linked where a string total amount is exceeded
The error you have means there is too many forms (actual BIOS menus/submenus/pages etc), so you can’t easily just remove some of those and it be OK.

I can disable HPET for you, on Spread Spectrum what do you mean “every setting” Normally if you disable spread spectrum it’s disabled

For these settings, there is three main possible places to change them to enabled/disabled, and some BIOS use one or the other so you may need to disable in all areas or possibly only one, but you’d have to test one by one to find out which is used or just set them all at once.
Those are setup module, AMITSE/SetupData module (This is what AMIBCP changes), and finally NVRAM. NVRAM can have multiple volumes at top of BIOS (usually 1-2) and then 1-2 more in other BIOS volumes, usually at least one in same volume as setup module, and then 1-2 others at last volume.
And those NVRAM may not always hold same setting values as you search them out, so it’s tricky to mod sometimes

Setup edit is easy, you find the setting string in hex from the IFR, then you change which setting is default via hex. Here is example from IFR for your BIOS

One Of: High Precision Timer, VarStoreInfo (VarOffset/VarName): 0xA86, VarStore: 0x1, QuestionId: 0x634, Size: 1, Min: 0x0, Max 0x1, Step: 0x0 {05 91 E0 09 E1 09 34 06 01 00 86 0A 10 10 00 01 00} << Search this string on PE32 module, edit as below
One Of Option: Disabled, Value (8 bit): 0x0 {09 07 04 00 00 00 00} << replace 00 in bold here with 30
One Of Option: Enabled, Value (8 bit): 0x1 (default) {09 07 03 00 30 00 01} << This 30, move to above at same position, replace here with 00 - this is what controls "Default"

Actually, can you see “PCH Configuration” page in your BIOS at Advanced section? If yes, you can easily make this setting visible to you as well (This may require setup only edit, or setup + AMIBCP Access Level (AMITSE/SetupData Instead))
Setup edit is simple, unsuppress by making this edit, then it will be visible in BIOS unless setupData also needs edited to change access level to User/Supervisor (Which I didn’t show below
sad.svg
) - Added info pre-post, but it’s already set to visible by default there
wink.svg

Due to checking all this, I now can answer myself at above question, no you cannot see PCH Config on Advanced BIOS page
wink.svg


Suppress If {0A 82}
True {46 02} << Change this to 47 02 (= false)
One Of: High Precision Timer, VarStoreInfo (VarOffset/VarName): 0xA86, VarStore: 0x1, QuestionId: 0x634, Size: 1, Min: 0x0, Max 0x1, Step: 0x0 {05 91 E0 09 E1 09 34 06 01 00 86 0A 10 10 00 01 00} << Search this string on PE32 module, directly in front of it you will see above edit
One Of Option: Disabled, Value (8 bit): 0x0 {09 07 04 00 00 00 00}
One Of Option: Enabled, Value (8 bit): 0x1 (default) {09 07 03 00 30 00 01}

Now, to edit AMITSE/SetupData, find this in main BIOS volume (Same one that contains setup), it’s usually near the bottom of the volume and often directly below AMITSE module.
Make sure you are extracting AMITSE/SetupData (body). You may need to look at BIOS side by side in UEFITool NE and regular, sometimes the AMITSE/SetupData module (at least SetupData itself) is not shown by name in regular UEFITool.
This side by side comparison will help you make sure you are extracting and replacing the correct module. I always use NE version for all inspections, extractions etc, it’s just easier to find due to often giving more info/names etc, and it auto gives you the correct name in full when you extract too
Once you’ve extracted the SetupData body, edit using info below

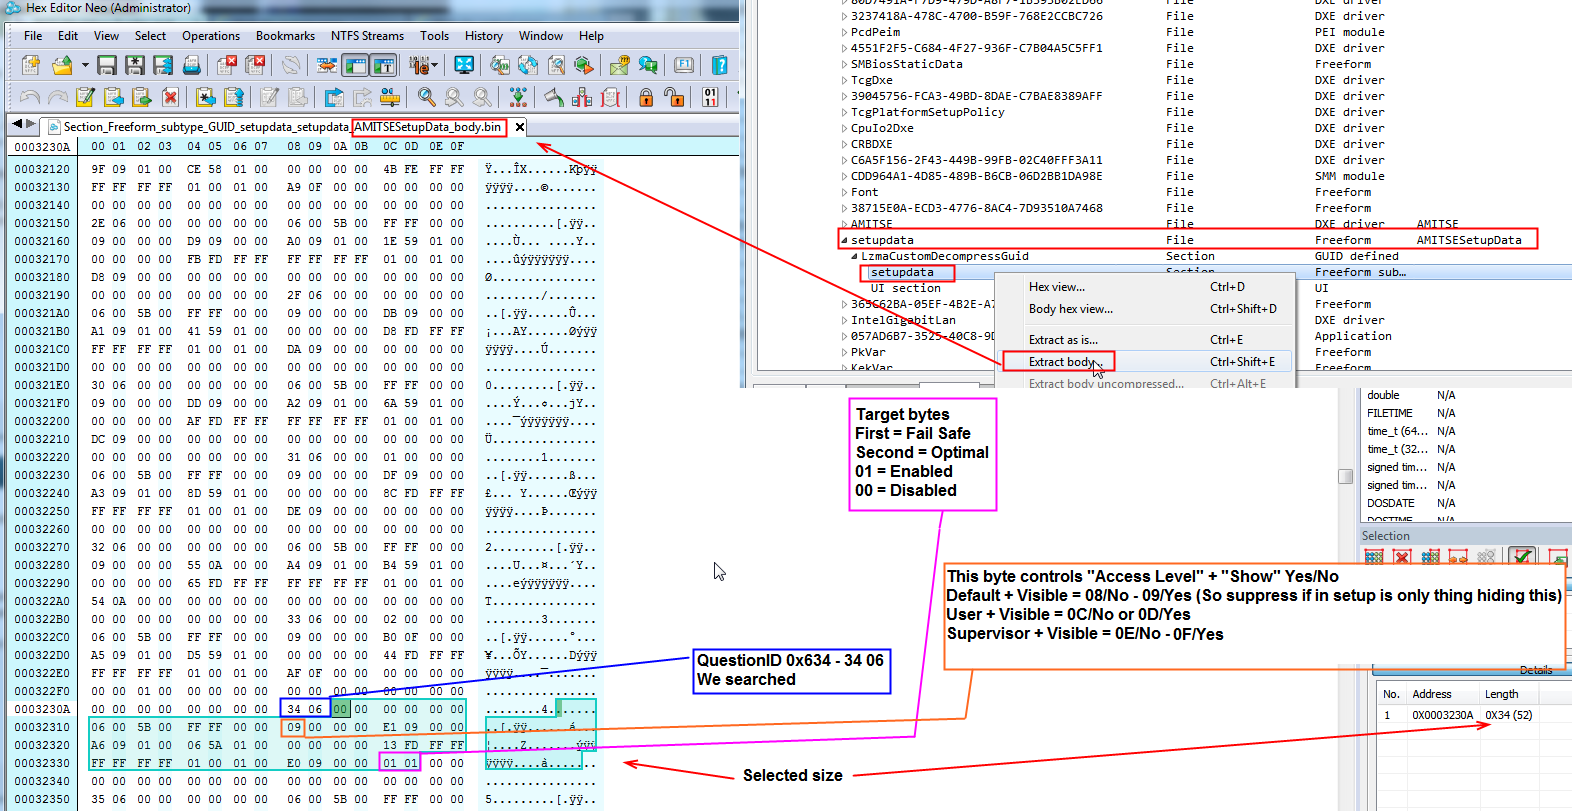
Using same setting as above for this example >> One Of: High Precision Timer, VarStoreInfo (VarOffset/VarName): 0xA86, VarStore: 0x1, QuestionId: 0x634 << this is what we’ll hunt down here (backwards in hex so = 34 06)
Open the SetupData body module in hex, search (Find all) that QuestionID backwards in hex 34 06, last result will hold the failsafe/optimal settings that you change in AMIBCP. The setting bytes are 34 bytes past the ID, so bytes 33 and 34 are Failsafe/Optimal
To change “Access Level” is 0xF (15) bytes past the ID >> Type - Access Level / Show Yes/No - DEFAULT = 00/No - 01/Yes (08/No - 09/Yes) USER= 04/No - 05/Yes (or 0C/No - 0D/Yes) Supervisor= 06/No - 07/Yes (Or 0E/No - 0F/Yes)
Default = 29 (Yes) / 28 (NO) / User = 2D (Yes) / 2C (NO) / Super/Admin = 2F (Yes) / 2E (NO)
Here is image example of this for the above setting, both are currently set to 01 (enabled)

AMITSE-SetupData-Edit-Instead-Of-AMIBCP2.png


NVRAM edit is too many areas and too involved to explain/show without making out an in-depth guide. Hopefully you will not need this.
If you do all of above and it still is enabled, then let me know and I can mod the NVRAM for you
 

Anhänge

  • Bios Edit.zip
    1,7 MB · Aufrufe: 25
  • Alle_Einstellungen_mit_Accesslevel_09.txt
    11,6 KB · Aufrufe: 35
Zuletzt bearbeitet:
Laut Foren scheine ich in der Geschichte der Asus B550-Boards nicht ganz der Einzige mit solchen Bootloops zu sein, aber die meisten konnten irgendwann 3002 installieren und hatten keine Probleme mehr.
Ich hab gerade seit langem mal nachgeschaut. Ich hab ein TUF Gaming B550 und muss nicht flashen. Dennoch habe ich 3001 installiert -> und es gibt 3607.
Also besser "Hands up"? Wie gesagt, ich muss nicht installieren, aber die Frage stellt sich mir gerade, ob das gut gehen würde.
 
Hardwareluxx setzt keine externen Werbe- und Tracking-Cookies ein. Auf unserer Webseite finden Sie nur noch Cookies nach berechtigtem Interesse (Art. 6 Abs. 1 Satz 1 lit. f DSGVO) oder eigene funktionelle Cookies. Durch die Nutzung unserer Webseite erklären Sie sich damit einverstanden, dass wir diese Cookies setzen. Mehr Informationen und Möglichkeiten zur Einstellung unserer Cookies finden Sie in unserer Datenschutzerklärung.


Zurück
Oben Unten refresh