Abtrünnig
Neuling
- Mitglied seit
- 15.01.2024
- Beiträge
- 15
Follow along with the video below to see how to install our site as a web app on your home screen.

Anmerkung: this_feature_currently_requires_accessing_site_using_safari
Es könnte auch das neue update sein, ich weiß nichtIc habe gerade das neue Revi W11 installiert. Es gibt kein iso mehr, muss zuerst original W11 installiert werden. Danach Playbook, und muss nochmal ueber Playbook Revi da rauf.
You won the lottery.Dear all, let me introduce my 14900KF, the most leaky CPU you've ever seen
Working on 2x 24GB @8000, will post some results soon. I hope it is doable.

Not at all. It's more complicated. The PC is in the bedroom, and the vents are set to low noise, CPU performance is not that important.You won the lottery.
Do you have the cooling for this Chip ?. Not at all, It's more complicated. The PC is in the bedroom, and the vents are set to low noise, CPU performance is not that important.
You can replicate our last posts V/F curve ~ and set Bios SVID preset to "trained"Not at all. It's more complicated. The PC is in the bedroom, and the vents are set to low noise, CPU performance is not that important.
CPU is air cooled by D15S, with single 140mm.
Thanks a lot. This is with power Watt unlimited, capped 400A. I guess I can limit PL1 power watts to maybe 150W and PL2 to 162W and 280A cap then. How long I should set the time in seconds, it´s the question. And I will start with TM5 + VST/VT3. Let the fun beginYou can replicate our last posts V/F curve ~ and set Bios SVID preset to "trained"
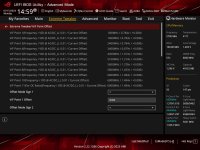
ICCMAX at 400A, powerlimit maxed.
CPU will throttle by itself, no worries.
Once y-cruncher 90min stable (make it all tests) , you can limit PL1 to your target cooler/psu limit
And PL2 (short/burst powerlimit) to ~12W higher.
Around 280A ICCMAX for sub 150W.
Dont set ICCMAX before you verify it is able to sustain and hold high temps.
CPU has to be capable to self throttle and sustain 105° (95 per core)
EDIT:
Do NOT use any fixed core/cache/ring voltage nor fixed clock
~ if you care about the life of your CPU.
Thanks a lot. This is with power Watt unlimited, capped 400A. I guess I can limit PL1 power watts to maybe 150W and PL2 to 162W and 280A cap then. How long I should set the time in seconds, it´s the question. And I will start with TM5 + VST/VT3. Let the fun begin
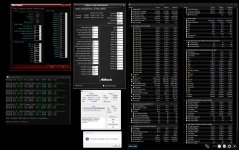
Thank you a lot, much appreciated! I did not modify the V/F curve at all, I passed that CPU part. About CPU I did only setting ASUS MultiCore Enhancement to Enable, and set CPU Core/Cache Current Limit Max. to the 400A.Anhang anzeigen 960043
You did put in the V/F curve ?
Well result for sure says, CPU is not defective and needs no RMA.
Fortunately , or so ~ haha.
It would be a lovely CPU under LN2. But definitely not for ambient.
I would like to see the same torture test with the curve.
I expect it to be also stable ~ because it will keep staying ICCMAX (400A) limited, although you would first thermal throttle naturally.
But you have to check on the worst worst case scenario.
If it doesnt know how to throttle, then something is not ok with it.
Good to see memOC was easy too.
Makes it now even easier for you to blame "lack of voltage" for memOC issues, instead of falling into rabbit.hole of variables.
Nice to see (and)
Let y-cruncher do y-cruncher things. It knows how to configure itself.
For memOC stability, after you are done with the CPU section ~ you want to only select VST+VT3.
The alternation of both causes some unhappy scenario and bellow 90min the chance to crash is very high.
For 8200MT/s
If you don't touch VDDQ_CPU & VDDQ_MEM , nor SA anymore
You'd need est. 1.43-1.44 MC (VDD[2]_CPU). Keep it bellow VDD_MEM.
Else if you scale VDD_MEM, scale both VDD & VDDQ on the same way. And the same amount on VDDQ_CPU (TX).
I think 155W PL2, 140W PL1 with ICCMAX 280A, sounds reasonable.
Before you create any power limiter throttle scenario which can create instability
~ be sure to sort out the CPU side first
Set the curve before thatNow I will set the 155W PL2, 140W PL1 with ICCMAX 280A as you recommended.
Ok, this is very far beyond my experience, but I will try.Set the curve before that
And torture it.
We wanted that initially.
Later once that passes, you can powerlimit it
Powerlimiting it now, may be a waste ~ because you dont know if curve fits your sample at all.
EDIT:
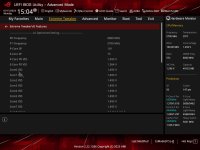
Curve and SVID preset to "trained"
IA_AC Loadline to 0.6 for now.
all CEP's to disabled. No need for CEP when user is the current protection. Curve is made to not reach ICCMAX.
If that fails, increase IA_AC to lets say 0.8
Thats more than plenty. Stock is 1.1ohm
Hi!Can you try something for me please ?
On your powerplan put lowest Idle state to 0%
And run https://drive.google.com/file/d/1vG6cHcK59aYiqvVlVHK73JpksjOyWs9z/
HWInfo to 500ms pooling, everything closed. Only visible Per-Core VID & effective clock.
Taskmanager stop service:
WinUpdate, WebAccountManager
Make a phone recording if you can.
")
https://www.hardwareluxx.de/communi...-ram-oc-thread.1306827/page-422#post-30236889Reading old posts, but I am still lost. This is what I get if I use the Tool and "generate" curve.
Not going too well. Random freezes right when R23 starts, same Geekbench Y-Cruncher 2.5b. When increased IA_AC Loadline from 0.6 to 0.8, still the same. Should I go higher, or change something else please?https://www.hardwareluxx.de/communi...-ram-oc-thread.1306827/page-422#post-30236889
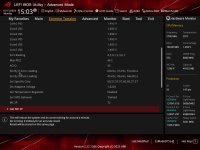
Copy his values and put into the Bios.
Then change SVID mode to trained.
Anhang anzeigen 960080
Instead of loading Intel's Presets.
If there is instability, increase IA AC_LL slightly higher.
There shouldn't be any.
Verify with multiple types of loads
Cinebench R20/23, Y-cruncher SFT+VST+VT3 (or just all tests, running duration is more important to create noise)
Geekbench , Games
And if it behaves fine till tomorrow and no random freezes too
Then ICCMAX it lower and put the powerlimits in for more efficiency on your cooling solution.
Else would be fully fine just with ICCMAX, but air coolers have less soaking headroom vs custom loops.
HmmmWhen increased IA_AC Loadline from 0.6 to 0.8, still the same. Should I go higher, or change something else please?
Yes, everything is correct. For sure I am as well uploading BIOS with 0.6 IA_AC in text form if you may check if I did a mistake.Hmmm
Just to verify, sorry if i ask the 3rd time the same question
ICCMAX was 400A
No set voltage on ring,
No set voltage on e-cores
No set voltage on L2
^ no voltage offsets either
No usage of PLLs
CEP off and SVID Preset to Trained
No modification in Loadline's Menu
No BLCK
Ringdownbin remains on Auto
No fixed clock or target clock
TVB was not higher than +1
No usage of processorlasso
Everything correct ?
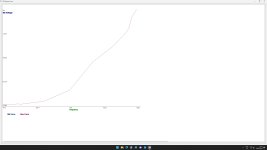
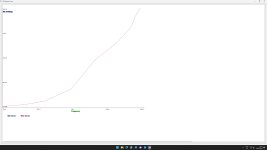
May you upload the visual curve by Shamino's [ASUS] Tool.exe ?
On .6 IA_AC and .8 IA_AC ~ please.
I need to separate memOC issues by lack voltage for IMC
// VDD2_CPU (MC Link) is not IMC voltage. IMC voltage is auto
from
Peak boost idle freezes
from
Ring and lower clock ramp-up issues (curve inconsistency)
// Ring and Core curve goes hand in hand
Interesting.Yes, everything is correct. For sure I am as well uploading BIOS with 0.6 IA_AC in text form if you may check if I did a mistake.
0.6 IA_AC = Cinebench R23 crash right at the start and PC restarts. Y-Cruncher 0.8.2 2.5b restarts PC right at the start.
0.8 IA_AC = Cinebench R23 lasts usually few seconds, and then PC froze. Y-Cruncher 0.8.2 2.5b works fine and gives the best result I ever had.
Thank you
Yes, everything is correct. For sure I am as well uploading BIOS with 0.6 IA_AC in text form if you may check if I did a mistake.
0.6 IA_AC = Cinebench R23 crash right at the start and PC restarts. Y-Cruncher 0.8.2 2.5b restarts PC right at the start.
0.8 IA_AC = Cinebench R23 lasts usually few seconds, and then PC froze. Y-Cruncher 0.8.2 2.5b works fine and gives the best result I ever had.
Thank you
Can´t make it works, every combination is unstable. CPU_AUX to 1.9V did not help as well.Interesting.
Let me respond till tonight.
4.7 range requests near 1020-1030mV
While for both of the guys its near 1070-1100mV
Go with 1ohm IA
or auto both.
Input LLC 3 and play with core loadline.
Ill inspect it later and check if we can figure something out that works for all.
Had purposely strong droops but your CPU seems was quite efficient on the mid-high side.
Just caused it to struggle due to too strong droop. And very likely didnt scale far on clock, soo peaks are extreme.
Curve by itself is ok i feel, just shift it up with AC_LL.
And then see what loadline is ok for your sample.
Had to be ok with LLC3 but your fused curve seems to be a bit different vs both of the samples.
EDIT:
Alternatively check if CPU_AUX 1.8v rail, to 1.9v will do the trick.
But we may need another full redesign. I want it tho to be universal & users can then scale it up / down with AC_LL.
EDIT2:
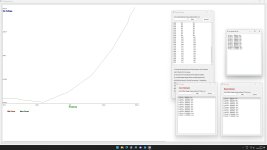
Verify perf scaling on those 5 applications
Anhang anzeigen 960194
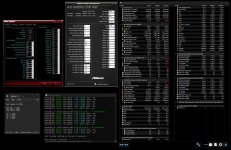
Curve is for 12th gen, don't copy that.
Vout is diesense , VID is current VID, Curve is fused/trained curve points.
All those 3 values can be tracked with tool.exe . HWInfo needs to stay off, when you use Tool.exe
HWMonitor doesn't bother , HWInfo does.
Don't focus on effective clock. It literally means zero in terms of perf.
Soo memOC is unstable then.Can´t make it works, every combination is unstable. CPU_AUX to 1.9V did not help as well.
So I did one more "experiment". All memory settings and frequency on auto, so memory run 5600 CL46. CPU settings, V/F settings etc all is exactly as you said. R23 is still unstable.Soo memOC is unstable then.
You played with ~80mV jumps in the curve.
There should have been some progress.
Original Curve , 7800MT/s or even 7600MT/s
Drop down and verify cores are behaving
Disable VDDQ Trianing while you figure out the actually correct voltages for memOC
Its not IMC not receiving enough from cores
Because the problem shouldve been fixed.
With you increasing voltage by such big margins
Youll figure it out
This is fact, unfortunatelyThis leads me to conclusion, unstability can´t be because of bad memory overclocking.
Unstability always come only when I change the V/F curve and set SVID to Trained.
Yes, I won't give up. I'll do everything I can. I wonder why it is the way it is. Thank you.This is fact, unfortunately
Why it happens, i am not sure.
Sadly i depend on you here to figure it out.
Because "causes issues" i know is a report but does not help. Over remote especially less.
We would need 5 careful attempts to figure it out and without you attempting further, i can not guide.
May you try to only lower IA_AC and see which point you reach till y-cruncher SFT crashes. So also geekbench and cinebench.
That is with high powerlimits and 400A ICCMAX.
If you keep reaching PL4, you can not count on reaching high memOC.
Can you try to figure out, if any of the SVID Presets run for you ?


Vieel zu kurzer Test um jegliche Stabilität auszumachen
Danke, werde ich definitiv versuchen.Vieel zu kurzer Test um jegliche Stabilität auszumachen
Aber es sieht schon gut aus.
Wenn du VDDQ_MEM um 60mV droppst (von 1515 auf 1430),
dann kann VDDQ_CPU (TX) von 1.370 auf 1.320 runter
Bzw sogar 1.280mV
VST+VT3 ist schwer zu rennen. Die kombination macht es.90min war das für den VST/VT3 oder? (das könnte ich dann Morgen nach der Arbeit durchlaufen lassen)