Install the app
How to install the app on iOS
Follow along with the video below to see how to install our site as a web app on your home screen.

Anmerkung: this_feature_currently_requires_accessing_site_using_safari
Du verwendest einen veralteten Browser. Es ist möglich, dass diese oder andere Websites nicht korrekt angezeigt werden.
Du solltest ein Upgrade durchführen oder einen alternativen Browser verwenden.
Du solltest ein Upgrade durchführen oder einen alternativen Browser verwenden.
[Sammelthread] Logitech G15
- Ersteller Frossty
- Erstellt am
Meine kam heute... schickes Teil 
Bestellt vor genau 5 Wochen. Allerdings hieß es auch, dass Aboprämien zwischen 3-6 Wochen dauern können...
Die G15 haben sie rausgenommen und die G11 reingesetzt. Ich meine irgendwo gelesen zu haben, dass es bei der G15R Lieferengpässe gab...

Bestellt vor genau 5 Wochen. Allerdings hieß es auch, dass Aboprämien zwischen 3-6 Wochen dauern können...
Die G15 haben sie rausgenommen und die G11 reingesetzt. Ich meine irgendwo gelesen zu haben, dass es bei der G15R Lieferengpässe gab...
dionysos
Enthusiast
Wassermann
Neuling
Hab meine auch seit gestern. Soweit echt genial. Hau zwar immer auf die G-Tasten, werd mich aber wohl noch dran gewöhnen.
neonevangelion
Neuling
- Mitglied seit
- 08.09.2007
- Beiträge
- 64
welch blöder fred! da war mal wohl jemand ganz geil auf die g15 und mußte ständig bei pcgh 5 leute beschäftigen...
ich hab meine auch, die alte g15 vom 2 jahres abo ist leider defekt gewesen, hab sie an pcgh geschickt, und gebeten, das ich die neue g15 bekomme...und siehe da, da isse jetzt.
aber besser find ich die jetzt nicht unbedigt. das display ist sau klein, vllt. die hälfte der alten. tasten klappert und der tastton erinnert mich start an meine media pro bluetooth tastatur für die ps3. die farbe is irgendwie auch nicht so kräftig wie bei der alten. die m tasten gehen irgendwie zeitweise nicht, bzw. man kann keine schnellmakros abspeichern...komisch. vllt nen treiber problem?!
überzeugen kann sie mich nicht, aber für lau isse ok. wer die alte hat, brauch nicht wechseln! vllt. benutze ich sie für die ps3, oder die wii (proll )
)
ich hab meine auch, die alte g15 vom 2 jahres abo ist leider defekt gewesen, hab sie an pcgh geschickt, und gebeten, das ich die neue g15 bekomme...und siehe da, da isse jetzt.
aber besser find ich die jetzt nicht unbedigt. das display ist sau klein, vllt. die hälfte der alten. tasten klappert und der tastton erinnert mich start an meine media pro bluetooth tastatur für die ps3. die farbe is irgendwie auch nicht so kräftig wie bei der alten. die m tasten gehen irgendwie zeitweise nicht, bzw. man kann keine schnellmakros abspeichern...komisch. vllt nen treiber problem?!
überzeugen kann sie mich nicht, aber für lau isse ok. wer die alte hat, brauch nicht wechseln! vllt. benutze ich sie für die ps3, oder die wii (proll
 )
)TLLmeister
Enthusiast
Hab meine auch seit gestern. Soweit echt genial. Hau zwar immer auf die G-Tasten, werd mich aber wohl noch dran gewöhnen.
Wilkommen im Club.


dionysos
Enthusiast
am schlimmsten ist wenn ich schnell auf escape hämmern will.
dann öffnet sich nämlich plötzlich eine instanz firefox (belegt auf g1)^^
dann öffnet sich nämlich plötzlich eine instanz firefox (belegt auf g1)^^
TLLmeister
Enthusiast
am schlimmsten ist wenn ich schnell auf escape hämmern will.
dann öffnet sich nämlich plötzlich eine instanz firefox (belegt auf g1)^^
Genauso siehts bei mir auch aus, Firefox kam heut schon mehrmals urplötzlich zum Vorschein. ^^
Besonders doof ist aber PES 2008 auf G6, auch schon 2x passiert heute.

dionysos
Enthusiast
Besonders doof ist aber PES 2008 auf G6, auch schon 2x passiert heute.
jaja, das war dann der blinde "strg-griff"

FarscapeOne
Enthusiast
- Mitglied seit
- 28.01.2005
- Beiträge
- 1.452
Logitech G15 Refresh Blue LED Mod
So hier mein versprochenes HowTo, um die G15 Refresh auf blau umzubauen.
Als erstes mal was Ihr braucht:
Eine G15 Refresh
10x blaue PLCC2 3528 SMD LED (Ich hab diese.)
4x blaue 0805 SMD LED seitlich (Diese z.B.)
7x blaue 0603 SMD LED für M-Tasten und Caps Lock (Diese z.B.)
14x 0805 SMD Widerstand 82Ohm (Diese z.B.) man muss diese nicht unbedingt tauschen. Aber wenn der Widerstand kleiner ist, leuchten die LEDs eben etwas heller.
Lötkolben mit feiner Spitze
Schraubendreher
Ruhige Hand
Gute Augen
[What you need to do this MOD:
10x blue PLCC2 3528 SMD LED
4x blue 0805 SMD SideLED
7x blue 0603 SMD LED for M-Keys and Caps Lock
14x 0805 SMD Resistor 82Ohm
electric soldering iron
screwdriver
good eyes
smooth hand]
So dann fangen wir mal an:
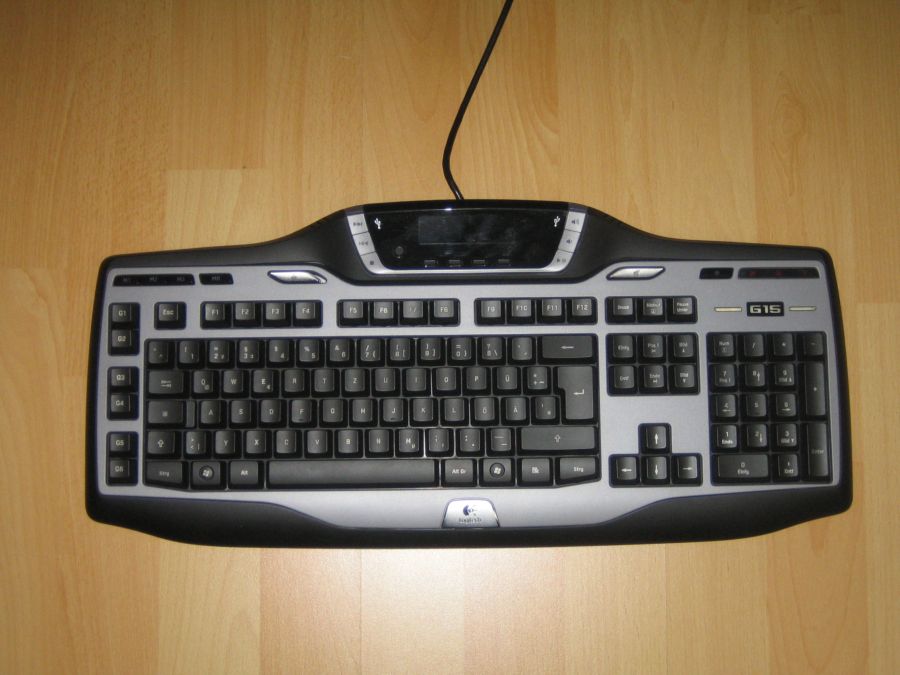
Als erstes Mal die G15 hinlegen:
[Place the G15 in front of you:]
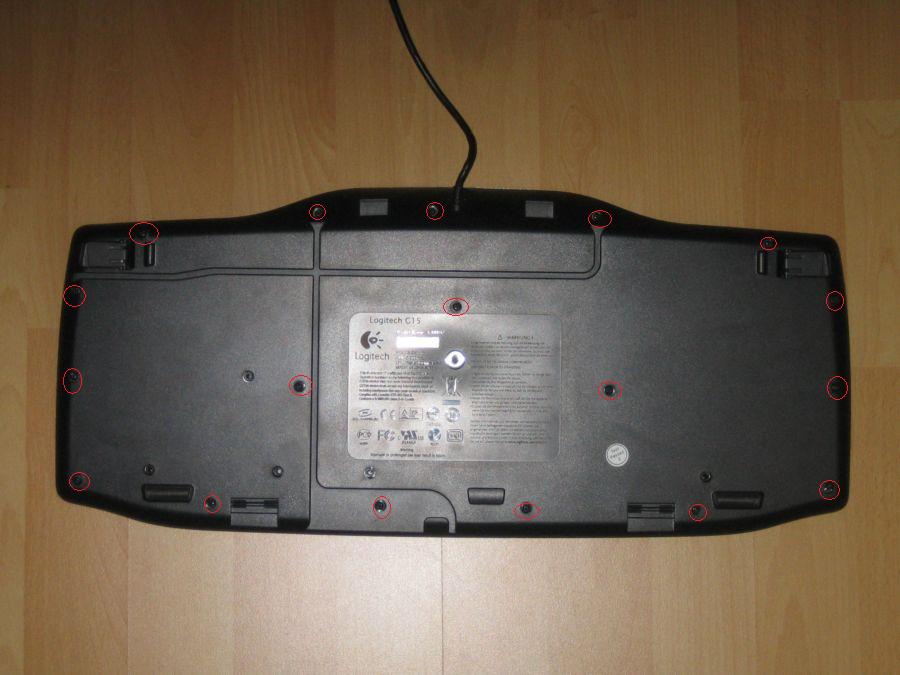
So dann umdrehen und die 18 Schrauben entfernen:
[Turn around and remove the 18 screws:]
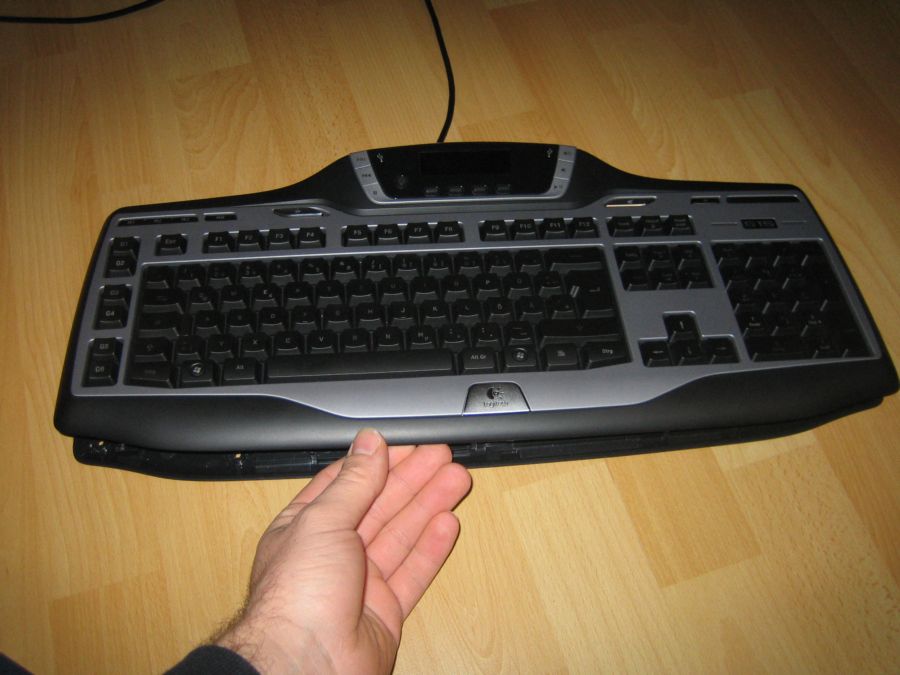
Dann vorsichtig von vorne her auseinanderklappen. An den Seiten geht es etwas härter, da dort die beiden Hälften geclipst sind:
[Then lift up carefully:]
Dann sieht das Ganze mal so aus:
[Now it looks like this:]
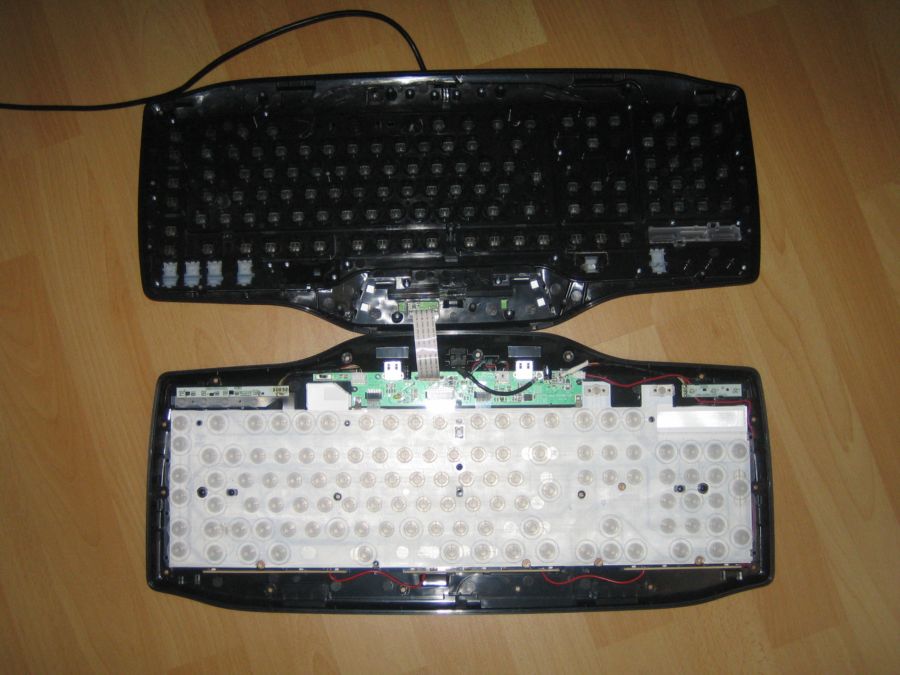
Und hier kann man schon mal die LEDs sehen:
[Here you can see the LEDs:]
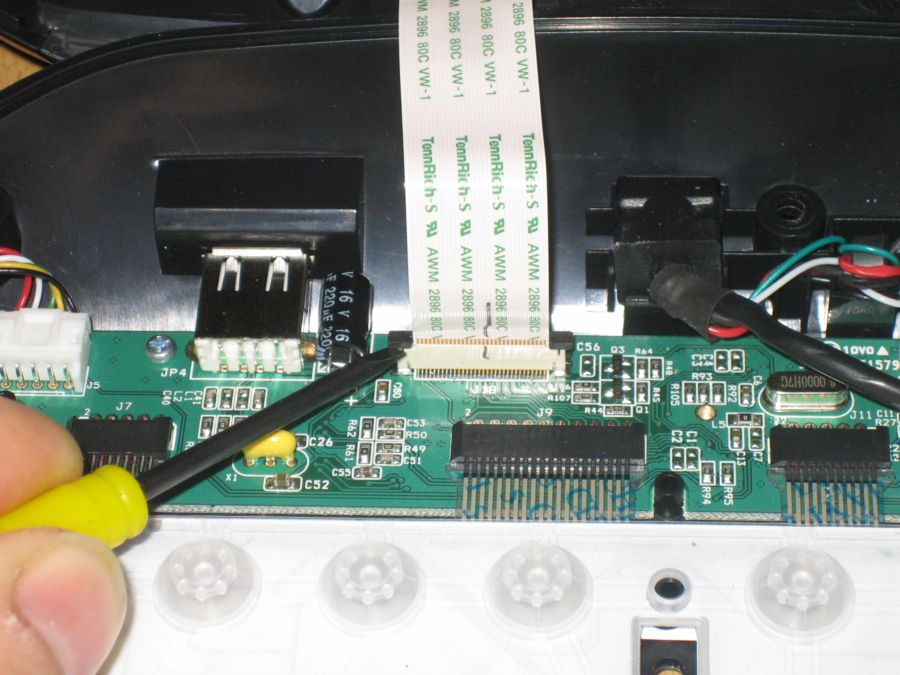
Nun kann man sich das Flachbandkabel mit nem farbigen stift markieren, damit man nachher wieder weiß wo es hin muss. Dann vorsichtig das Flachbandkabel abstecken. Dazu schiebt man die schwarze Verriegelung mit nem Schraubendreher nach oben und dann kann man das Kabel rausziehen:
[Now you can mark the flat ribbon cable with a colored pen, that you know later, where the cable was pluged on. Now plug off the flat ribbon cable. For this you must lift up the black latch with a tiny screwdriver. Then you can plug off the cable:]
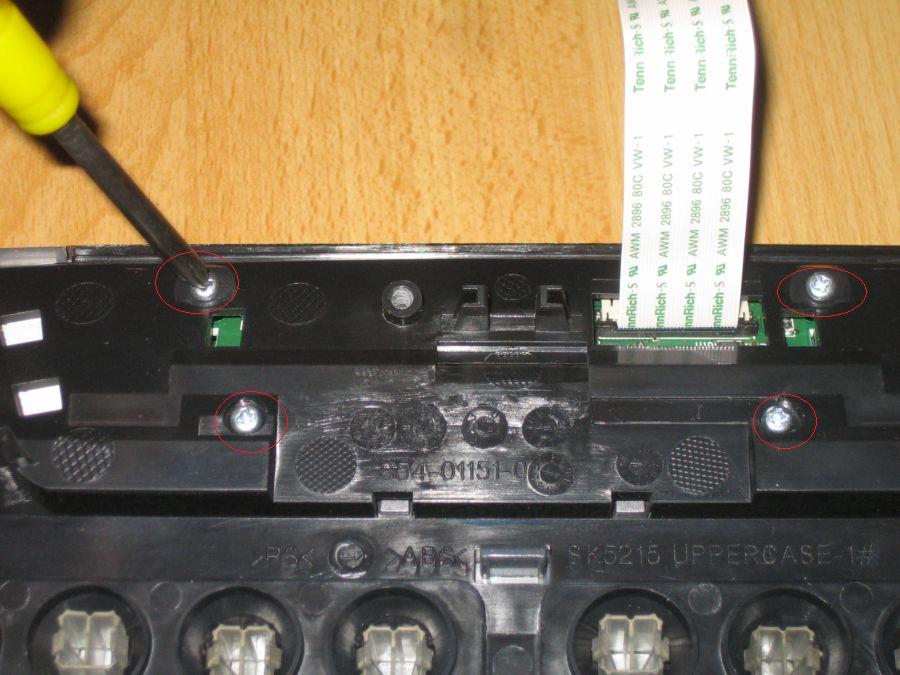
Dann die obere Hälfte nehmen und diese vier Schrauben entfernen:
[Then take the upper part from the G15 and remove this four screws:]
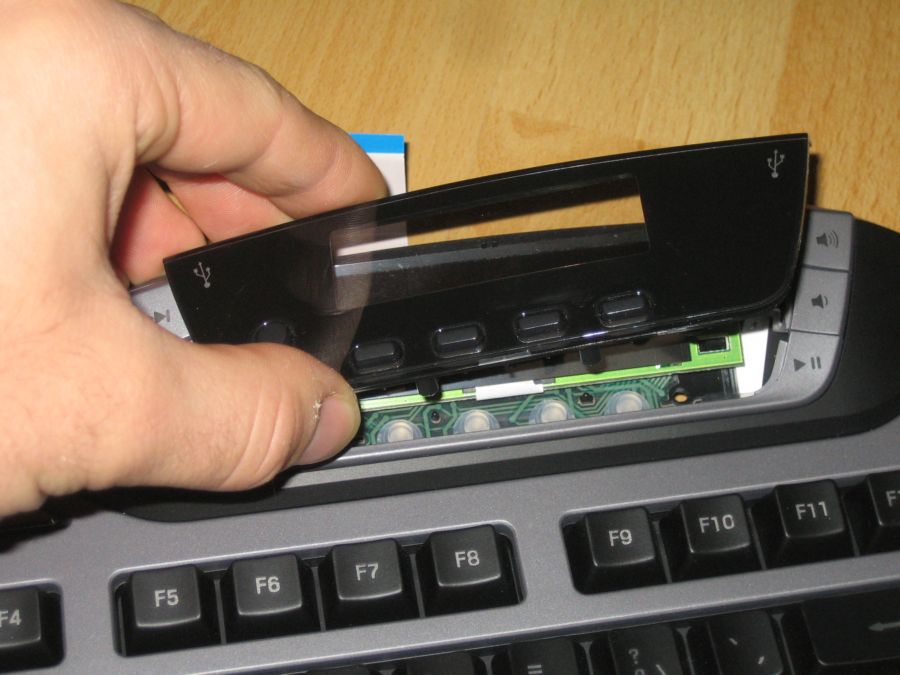
Dann kann man die Abdeckung vom Display runter nehmen:
[Now you can remove the cover from the Display]
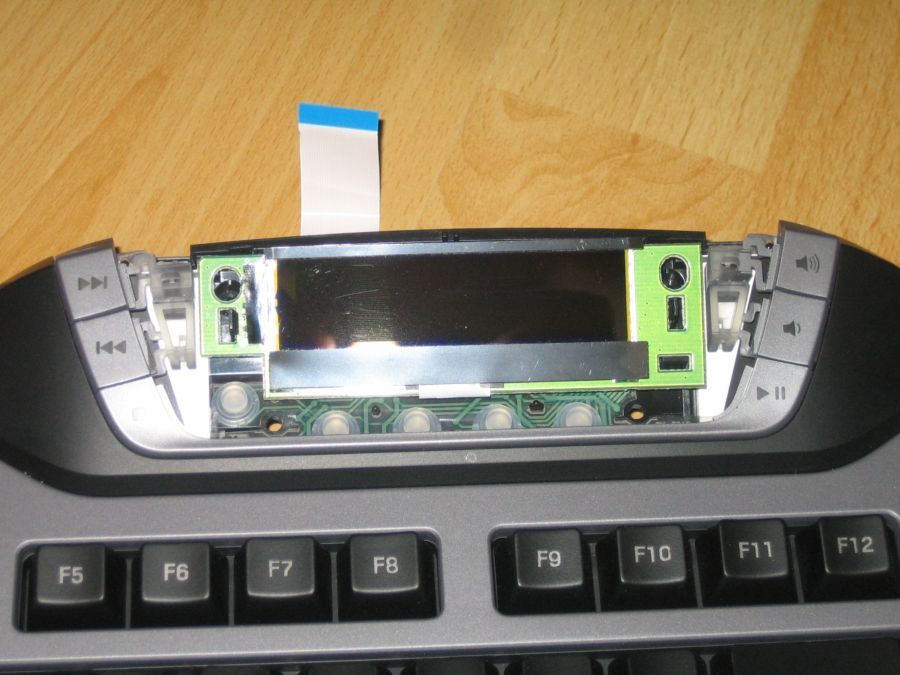
Nun das Display mit der Platine aus der Halterung clipsen:
[Then take the Display out of the mounting]

Jetzt hält man das Display etwas nach vorne und steckt nun zwei weitere Flachbandkabel ab, nachdem man diese auch markiert hat.
[Now you have to remove the two flat ribbon cables from the back of the display]

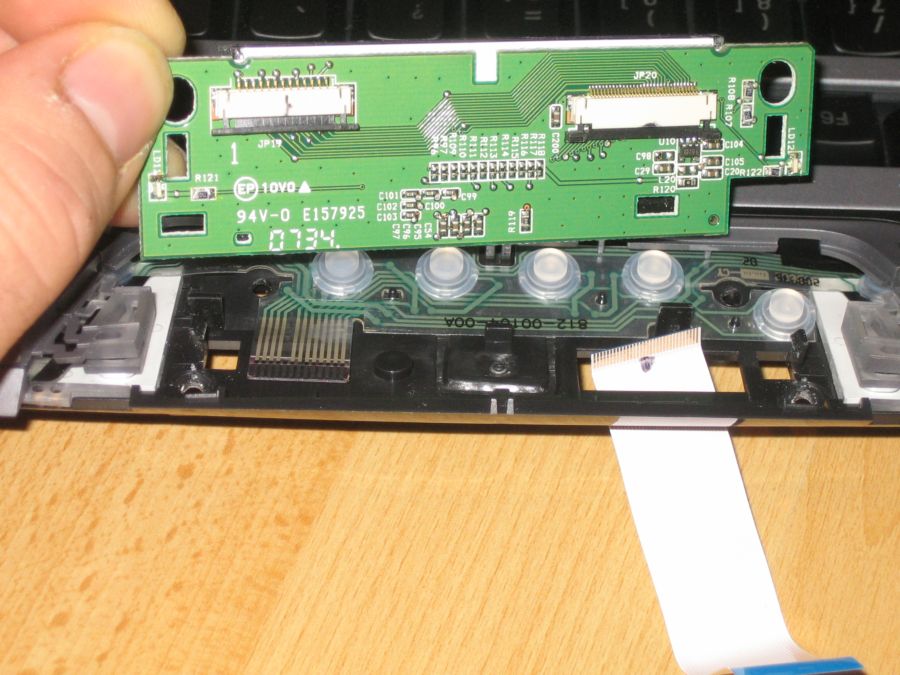
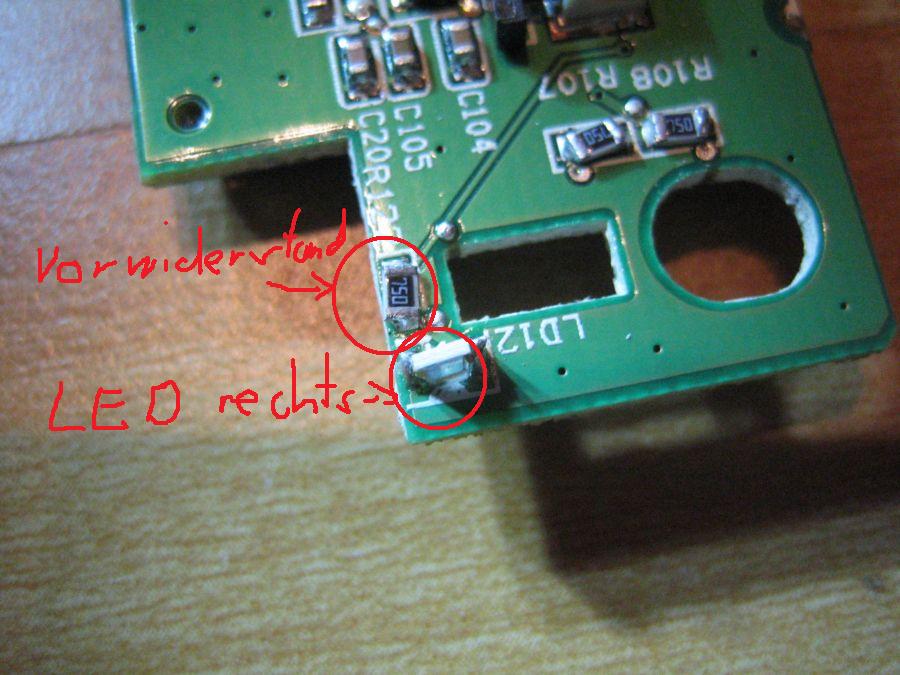
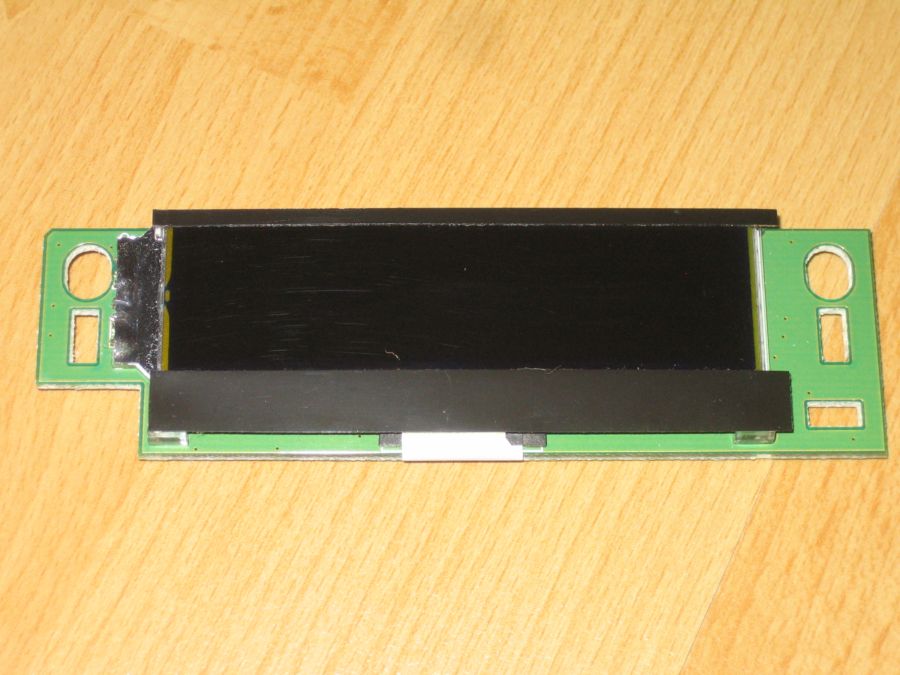
So, auf der Rückseite des Displays, sieht man nun zwei seitliche 0805er LEDs, die nach aussen strahlen und die Mediatasten beleuchten. Diese können nun gegen die blauen LEDs getauscht werden. Dazu tauscht man noch die rot Markierten Vorwiderstände und die blau markierten Vorwiderstände, welche für die LEDs der Displaybeleuchtung sind.
[Now you can see two sideLED 0805 which are illuminating the mediakeys left and right from the Display. You can they change now against the blue ones. Then you have to change the blue and red marked resistors against the 82 Ohm resistors:]


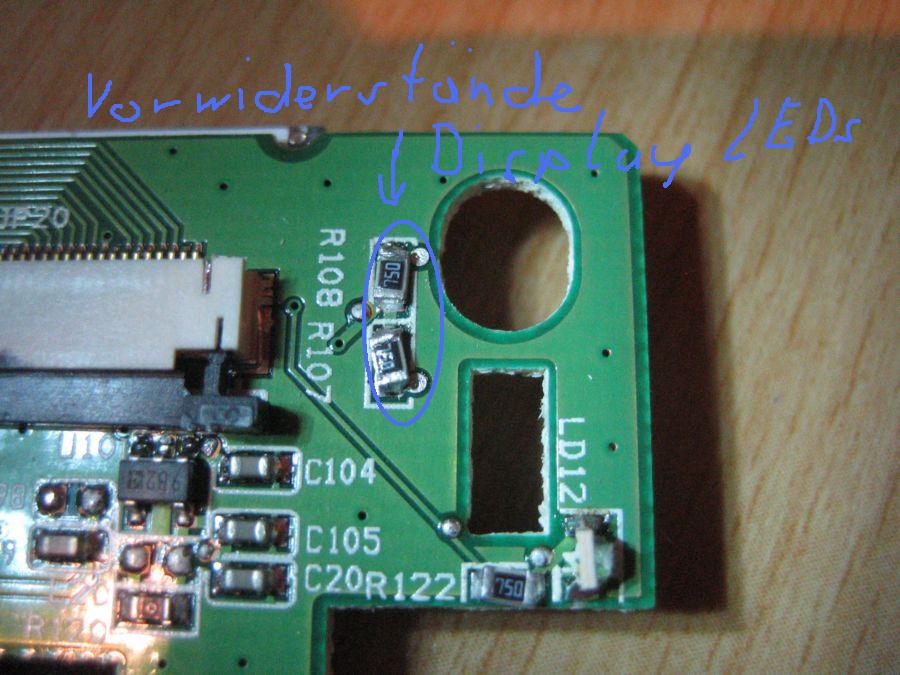
Nun widmen wir uns den beiden LEDs auf der Vorderseite des Displays. Diese sind etwas versteckt unter der silbernen Folie links. Die Folie kann man aber leicht etwas ablösen, da diese wie Klebeband ist. Ich hab die Folie dann mit Tesa auf dem Display fixiert, damit ich zum löten gut an die LEDs kam und die Folie nicht versengt habe.
[Now have a look at the two Leds on the front from the display. They are covered from the silver colored foil on the left side from the display. You must peel the foil away ad fix it with a stripe of tape on the display. Now you can change them against the two other blue sideLEDs:]
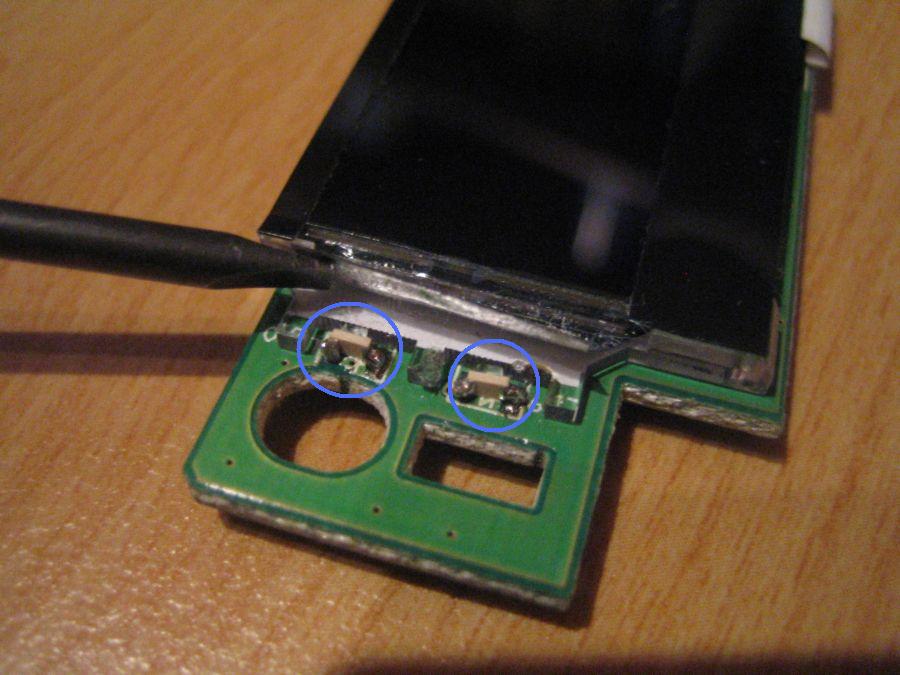
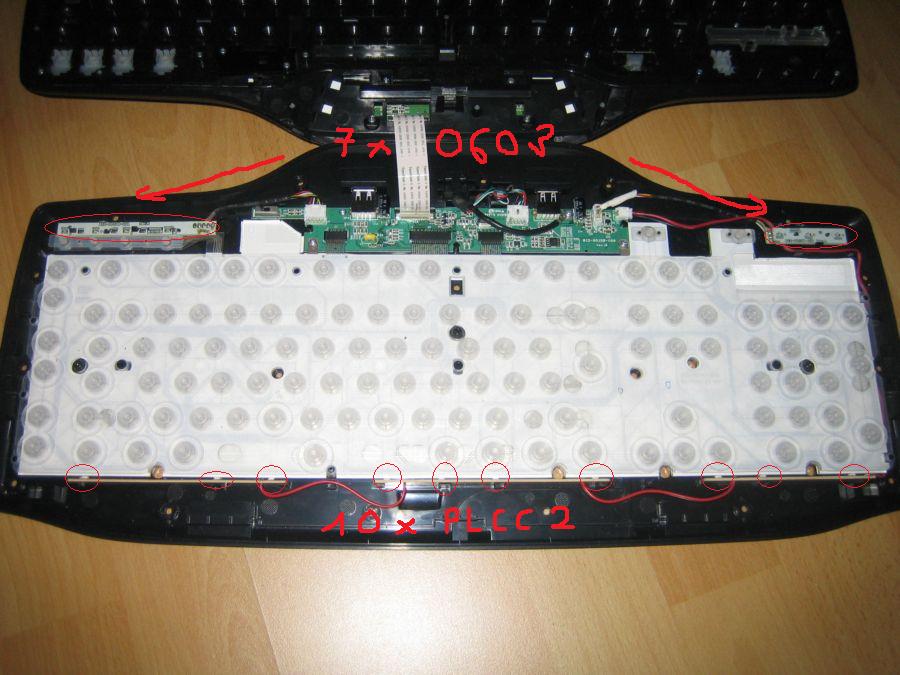
Nach dem Wechseln der LEDs kann man das Display erstmal beiseite legen und mit den M-Tasten-, den CapsLock- und NUM-LEDs anfangen. Diese habe ich persönlich nicht umgelötet, da mir der Kontrast rot-blau sehr gut gefällt. Hier braucht man dann die sieben 0603er LEDs. Die LEDs die getauscht werden müssen habe ich auf den Bildern grün markiert:
[After changing the LEDs we lay the display aside. Now you can start to change the LEDs from the M-Keys and for the Num and CapsLock indication. Here you need seven 0603 LEDs. The Leds, which you have to change, are shown in the picture in green:]
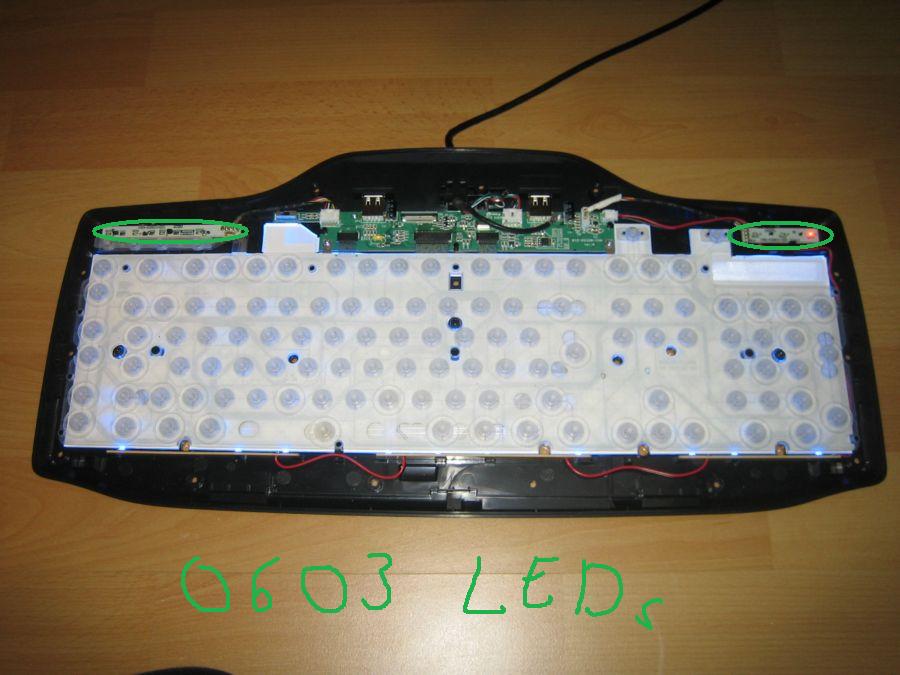
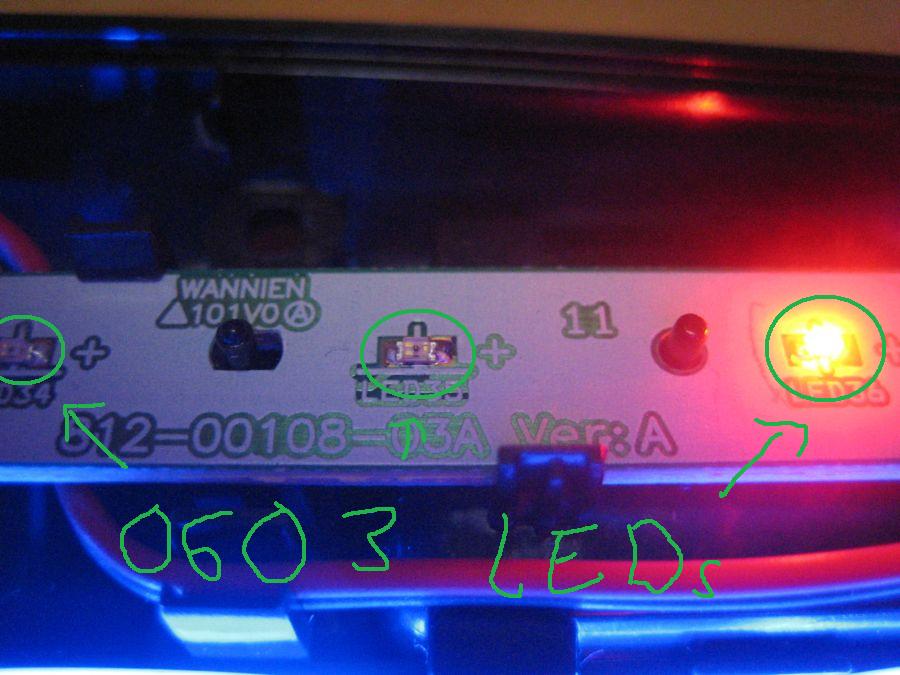
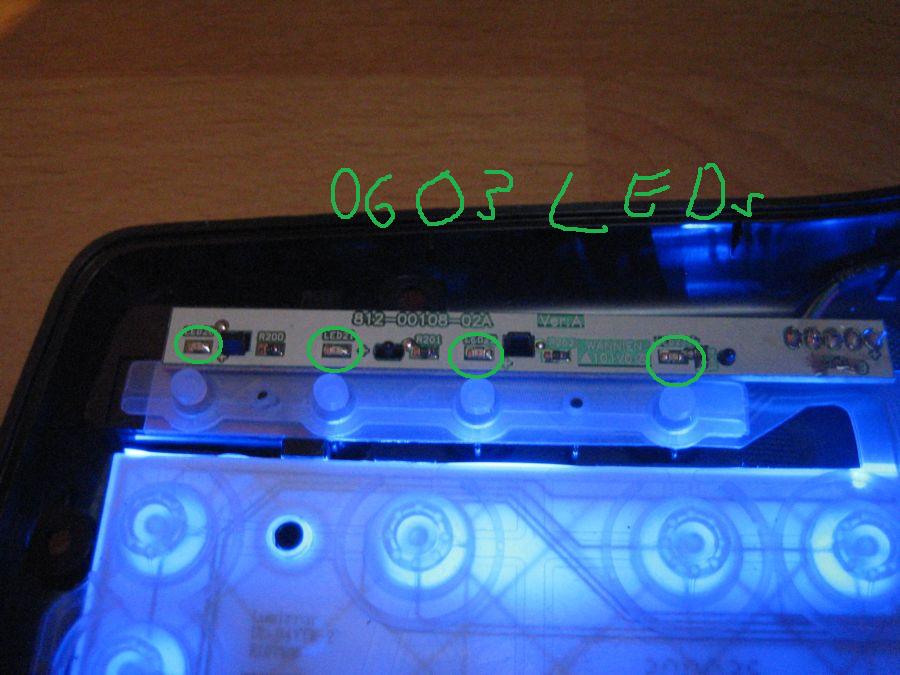
Damit die CapsLock und Num Anzeigen aber schön blau leuchten, muss man noch die Folie von der Tastatur entfernen und den roten Lack irgendwie abmachen. Vielleicht abschaben oder mit Spiritus entfernen. Wie gesagt, ich hab diese rot gelassen.
[That the NUM- and CapsLock indication glows pure blue, you have to remove the red paint from the foil, which is on the Top from the Keyboard. I havent done this because i like the conrast between blue and red:]

Und nun kommen wir zu der Tastenbeleuchtung. Hier sind orginal SMD PLCC-LED 3021 verbaut. Diese sind etwas kleiner als die LEDs, die ich gewählt habe. Ich hab mich für die SMD PLCC2-LED 3528 entschieden, da es diese mit einer deutlich höheren Leuchtkraft gibt als die 3021. Die LEDs, die ich verbaut habe, sind zwar etwas höher von der Bauform, passen aber mit etwas Fummelei auch locker in die Tastatur. Hier die LEDs die umgelötet werden müssen. Die Vorwiderstände, befinden sich immer genau über den LEDs.
And now lets get to the key illumination. There are original built in PLCC 3021 LEDs. These are a little smaller then the LEDs i have choosen. I have choosen the PLCC2 3528 LEDs because these got a higher intensity. The 3528 LEDs are a little bigger then the original LEDs but those will do it. In the pictures are shown the LEDs wich you have to change. The dropping resistors are always over the LEDs:]
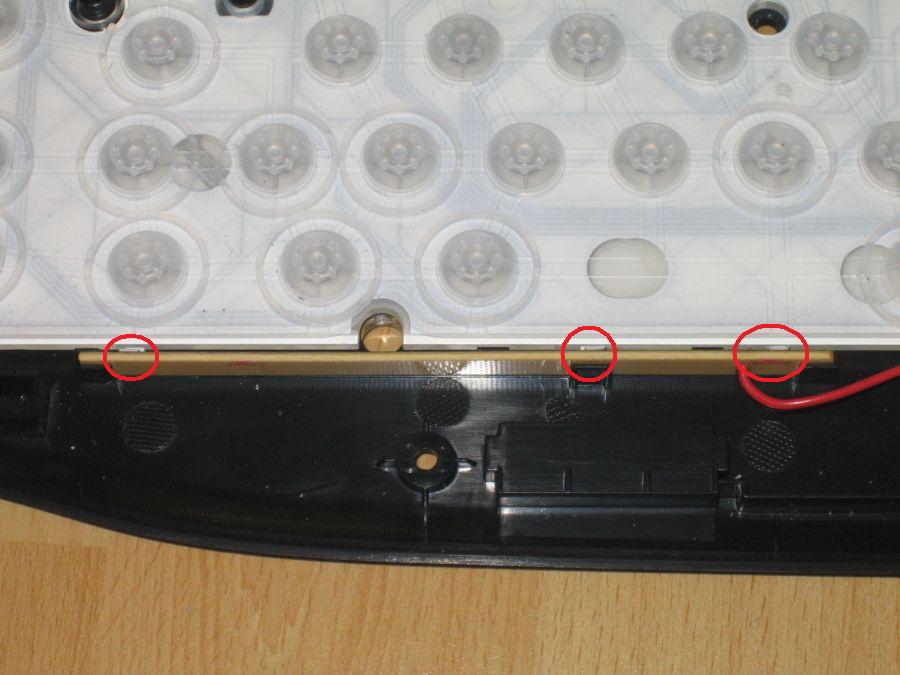

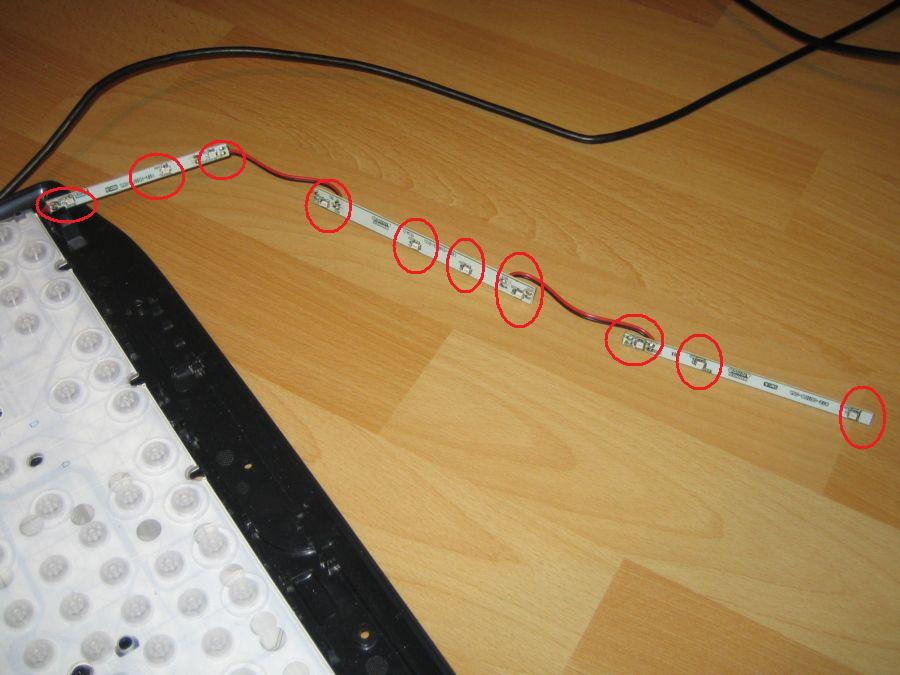
Am besten man lötet die Kabel von den kleinen Platinen ab, damit man dann besser an die LEDs und Vorwiderstände kommt.
[You can change the LEDs and dropping resistors easier when you remove the cables from every board:]
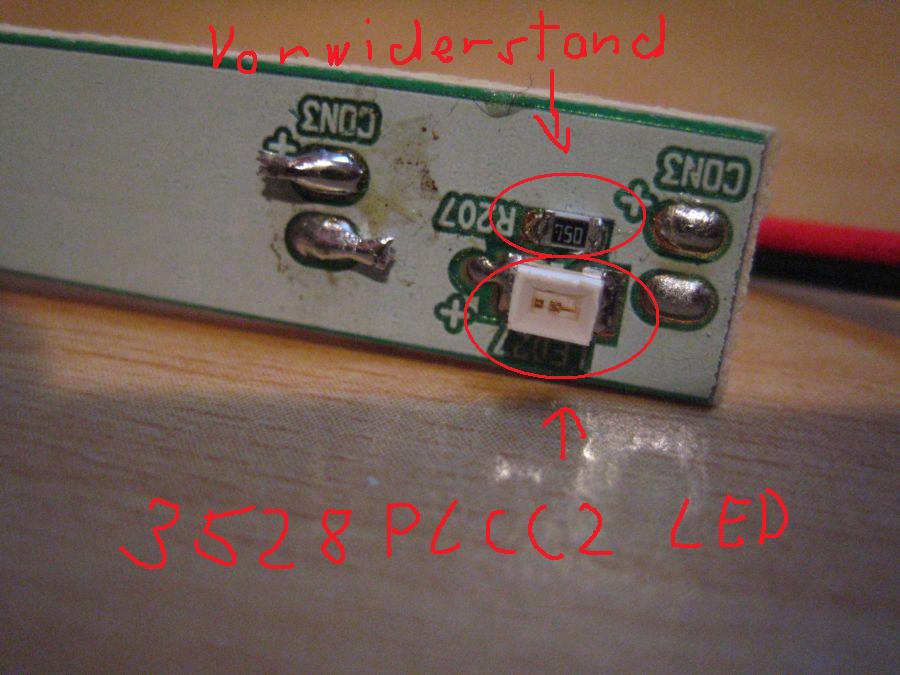
Wenn man´s dann umgelötet hat, und die Kabel auch wieder dran sind, kann man die G15 mal an den USB Port stecken und sehen, ob alle LEDs blau leuchten. Wenn das Display nicht angesteckt ist, flackert die Beleuchtung etwas. Also keine Angst, im fertigen Zustand flackert da nichts mehr.
[When you are ready with soldering, you can plug the G15 on the USB Port. Now should all LEDs glow. If the illumination do flicker. Thats normal when there is no display plugged on. When all is finished there is no flicker anyway:]
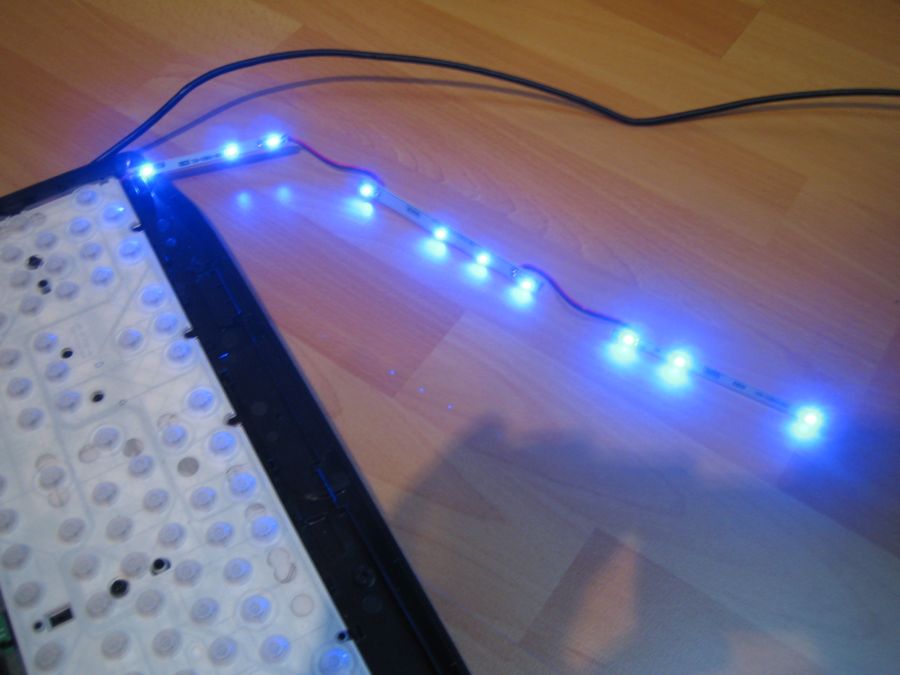
So nun steckt man die Platinen wieder an ihre ursprünglichen Platz. Hier aber vorsichtig, denn durch die etwas größeren LEDs geht dies etwas schwerer. Am besten das durchsichtige Plexi einfach etwas anheben und gleichzeitig mit der Platine nach unten schieben. Dann sollte es so aussehen:
[Now do the boards on the original place. Be careful because the new LEDs are a little bit bigger then the original ones. You do best when you lift the acrylic glas plate a little bit and move it down with the boards. This should look like in the picture:]

So dann wieder vom USB trennnen und erstmal das Display wieder einbauen und mit den Flachkabeln verbinden. Das durchsichtige Flachkabel, das zum Display geht, ist für die Mediatasten. Und ist auch sehr schwierig wieder anzustecken. Ich hab da mindestens 10 Minuten dafür gebraucht
Wenn dann alles wieder steckt, macht am besten noch nen Funktionscheck, bevor Ihr das Display festschraubt. Testet auch unbedingt die Tasten!
[Now plug off from the USB port and build the display in the G15. Plug the flat ribbon cables on, the tranparent cable is for the media keys. It is very difficult to plug it on. I have need more then ten minutes to plug it on. When this is done you should make a fungtion control. And dont forget to try the function from thr media keys!]
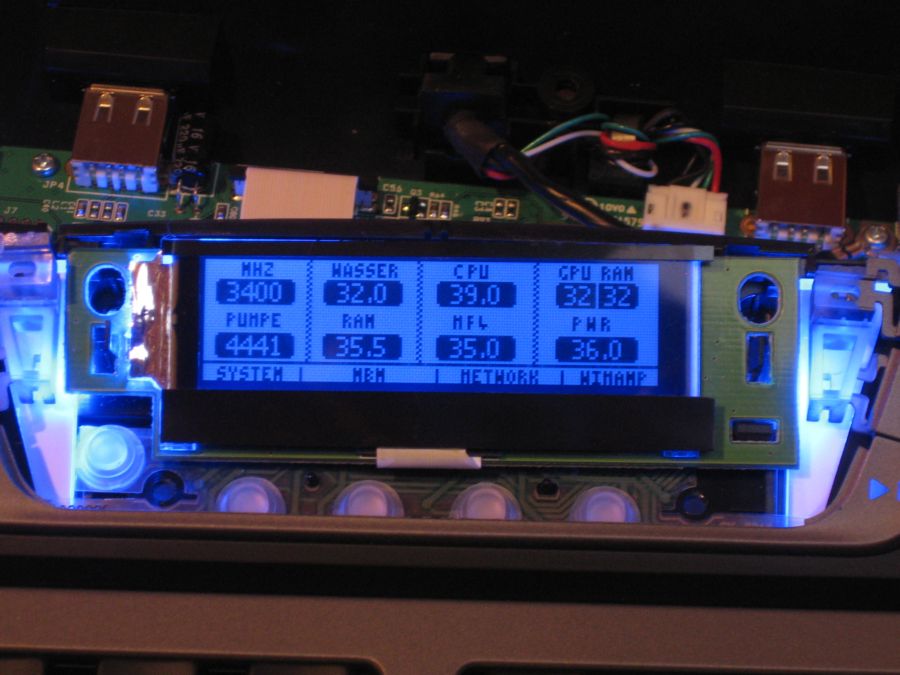
So dann das Display noch etwas säubern und wieder zusammenschrauben.
[Now clean the disblay and put it in the G15:]

Dann die zwei Hälften wieder zusammenclipsen und festschrauben. Fertig.
Wenn die Hälften oben beim Display schwer zusammen gehen, schiebt die Gummitülle vom Kabel mal etwas hin und her, bis es paßt.
[Then screw the two parts together. If it goes strong to put it togehter you have to move the rubber grommet in and out.]
Am Schluß sollte das dann so schön blau leuchten wie bei der alten G15:
[When its all done it should glow like the old G15:]

So ich hoffe ich hab nix vergessen und Ihr könnt mit meinem HowTo was anfangen. Wenn´s fragen gibt, einfach fragen. Natürlich geschehen alle Umbauten auf Eure eigene Gefahr. Und ich übernehme keine Haftung für eventuelle Schäden.
[I hope i have nothing forgotten to tell you and you understand every step from my HowTo. If you got any questions do ask here in the thread or per PN. All work is on you own risk. I am not liable for any defects.]
Greetz
FarscapeOne
So hier mein versprochenes HowTo, um die G15 Refresh auf blau umzubauen.
Als erstes mal was Ihr braucht:
Eine G15 Refresh
10x blaue PLCC2 3528 SMD LED (Ich hab diese.)
4x blaue 0805 SMD LED seitlich (Diese z.B.)
7x blaue 0603 SMD LED für M-Tasten und Caps Lock (Diese z.B.)
14x 0805 SMD Widerstand 82Ohm (Diese z.B.) man muss diese nicht unbedingt tauschen. Aber wenn der Widerstand kleiner ist, leuchten die LEDs eben etwas heller.
Lötkolben mit feiner Spitze
Schraubendreher
Ruhige Hand
Gute Augen
[What you need to do this MOD:
10x blue PLCC2 3528 SMD LED
4x blue 0805 SMD SideLED
7x blue 0603 SMD LED for M-Keys and Caps Lock
14x 0805 SMD Resistor 82Ohm
electric soldering iron
screwdriver
good eyes
smooth hand]
So dann fangen wir mal an:
Als erstes Mal die G15 hinlegen:
[Place the G15 in front of you:]

So dann umdrehen und die 18 Schrauben entfernen:
[Turn around and remove the 18 screws:]

Dann vorsichtig von vorne her auseinanderklappen. An den Seiten geht es etwas härter, da dort die beiden Hälften geclipst sind:
[Then lift up carefully:]

Dann sieht das Ganze mal so aus:
[Now it looks like this:]

Und hier kann man schon mal die LEDs sehen:
[Here you can see the LEDs:]

Nun kann man sich das Flachbandkabel mit nem farbigen stift markieren, damit man nachher wieder weiß wo es hin muss. Dann vorsichtig das Flachbandkabel abstecken. Dazu schiebt man die schwarze Verriegelung mit nem Schraubendreher nach oben und dann kann man das Kabel rausziehen:
[Now you can mark the flat ribbon cable with a colored pen, that you know later, where the cable was pluged on. Now plug off the flat ribbon cable. For this you must lift up the black latch with a tiny screwdriver. Then you can plug off the cable:]

Dann die obere Hälfte nehmen und diese vier Schrauben entfernen:
[Then take the upper part from the G15 and remove this four screws:]

Dann kann man die Abdeckung vom Display runter nehmen:
[Now you can remove the cover from the Display]


Nun das Display mit der Platine aus der Halterung clipsen:
[Then take the Display out of the mounting]

Jetzt hält man das Display etwas nach vorne und steckt nun zwei weitere Flachbandkabel ab, nachdem man diese auch markiert hat.
[Now you have to remove the two flat ribbon cables from the back of the display]


So, auf der Rückseite des Displays, sieht man nun zwei seitliche 0805er LEDs, die nach aussen strahlen und die Mediatasten beleuchten. Diese können nun gegen die blauen LEDs getauscht werden. Dazu tauscht man noch die rot Markierten Vorwiderstände und die blau markierten Vorwiderstände, welche für die LEDs der Displaybeleuchtung sind.
[Now you can see two sideLED 0805 which are illuminating the mediakeys left and right from the Display. You can they change now against the blue ones. Then you have to change the blue and red marked resistors against the 82 Ohm resistors:]


Nun widmen wir uns den beiden LEDs auf der Vorderseite des Displays. Diese sind etwas versteckt unter der silbernen Folie links. Die Folie kann man aber leicht etwas ablösen, da diese wie Klebeband ist. Ich hab die Folie dann mit Tesa auf dem Display fixiert, damit ich zum löten gut an die LEDs kam und die Folie nicht versengt habe.
[Now have a look at the two Leds on the front from the display. They are covered from the silver colored foil on the left side from the display. You must peel the foil away ad fix it with a stripe of tape on the display. Now you can change them against the two other blue sideLEDs:]


Nach dem Wechseln der LEDs kann man das Display erstmal beiseite legen und mit den M-Tasten-, den CapsLock- und NUM-LEDs anfangen. Diese habe ich persönlich nicht umgelötet, da mir der Kontrast rot-blau sehr gut gefällt. Hier braucht man dann die sieben 0603er LEDs. Die LEDs die getauscht werden müssen habe ich auf den Bildern grün markiert:
[After changing the LEDs we lay the display aside. Now you can start to change the LEDs from the M-Keys and for the Num and CapsLock indication. Here you need seven 0603 LEDs. The Leds, which you have to change, are shown in the picture in green:]


Damit die CapsLock und Num Anzeigen aber schön blau leuchten, muss man noch die Folie von der Tastatur entfernen und den roten Lack irgendwie abmachen. Vielleicht abschaben oder mit Spiritus entfernen. Wie gesagt, ich hab diese rot gelassen.
[That the NUM- and CapsLock indication glows pure blue, you have to remove the red paint from the foil, which is on the Top from the Keyboard. I havent done this because i like the conrast between blue and red:]

Und nun kommen wir zu der Tastenbeleuchtung. Hier sind orginal SMD PLCC-LED 3021 verbaut. Diese sind etwas kleiner als die LEDs, die ich gewählt habe. Ich hab mich für die SMD PLCC2-LED 3528 entschieden, da es diese mit einer deutlich höheren Leuchtkraft gibt als die 3021. Die LEDs, die ich verbaut habe, sind zwar etwas höher von der Bauform, passen aber mit etwas Fummelei auch locker in die Tastatur. Hier die LEDs die umgelötet werden müssen. Die Vorwiderstände, befinden sich immer genau über den LEDs.
And now lets get to the key illumination. There are original built in PLCC 3021 LEDs. These are a little smaller then the LEDs i have choosen. I have choosen the PLCC2 3528 LEDs because these got a higher intensity. The 3528 LEDs are a little bigger then the original LEDs but those will do it. In the pictures are shown the LEDs wich you have to change. The dropping resistors are always over the LEDs:]


Am besten man lötet die Kabel von den kleinen Platinen ab, damit man dann besser an die LEDs und Vorwiderstände kommt.
[You can change the LEDs and dropping resistors easier when you remove the cables from every board:]

Wenn man´s dann umgelötet hat, und die Kabel auch wieder dran sind, kann man die G15 mal an den USB Port stecken und sehen, ob alle LEDs blau leuchten. Wenn das Display nicht angesteckt ist, flackert die Beleuchtung etwas. Also keine Angst, im fertigen Zustand flackert da nichts mehr.
[When you are ready with soldering, you can plug the G15 on the USB Port. Now should all LEDs glow. If the illumination do flicker. Thats normal when there is no display plugged on. When all is finished there is no flicker anyway:]

So nun steckt man die Platinen wieder an ihre ursprünglichen Platz. Hier aber vorsichtig, denn durch die etwas größeren LEDs geht dies etwas schwerer. Am besten das durchsichtige Plexi einfach etwas anheben und gleichzeitig mit der Platine nach unten schieben. Dann sollte es so aussehen:
[Now do the boards on the original place. Be careful because the new LEDs are a little bit bigger then the original ones. You do best when you lift the acrylic glas plate a little bit and move it down with the boards. This should look like in the picture:]

So dann wieder vom USB trennnen und erstmal das Display wieder einbauen und mit den Flachkabeln verbinden. Das durchsichtige Flachkabel, das zum Display geht, ist für die Mediatasten. Und ist auch sehr schwierig wieder anzustecken. Ich hab da mindestens 10 Minuten dafür gebraucht

Wenn dann alles wieder steckt, macht am besten noch nen Funktionscheck, bevor Ihr das Display festschraubt. Testet auch unbedingt die Tasten!
[Now plug off from the USB port and build the display in the G15. Plug the flat ribbon cables on, the tranparent cable is for the media keys. It is very difficult to plug it on. I have need more then ten minutes to plug it on. When this is done you should make a fungtion control. And dont forget to try the function from thr media keys!]

So dann das Display noch etwas säubern und wieder zusammenschrauben.
[Now clean the disblay and put it in the G15:]

Dann die zwei Hälften wieder zusammenclipsen und festschrauben. Fertig.
Wenn die Hälften oben beim Display schwer zusammen gehen, schiebt die Gummitülle vom Kabel mal etwas hin und her, bis es paßt.
[Then screw the two parts together. If it goes strong to put it togehter you have to move the rubber grommet in and out.]
Am Schluß sollte das dann so schön blau leuchten wie bei der alten G15:
[When its all done it should glow like the old G15:]

So ich hoffe ich hab nix vergessen und Ihr könnt mit meinem HowTo was anfangen. Wenn´s fragen gibt, einfach fragen. Natürlich geschehen alle Umbauten auf Eure eigene Gefahr. Und ich übernehme keine Haftung für eventuelle Schäden.
[I hope i have nothing forgotten to tell you and you understand every step from my HowTo. If you got any questions do ask here in the thread or per PN. All work is on you own risk. I am not liable for any defects.]
Greetz
FarscapeOne
Zuletzt bearbeitet:
FarscapeOne
Enthusiast
- Mitglied seit
- 28.01.2005
- Beiträge
- 1.452
So, hier gibt´s mein HowTo http://www.forumdeluxx.de/forum/showthread.php?p=7577409#post7577409
is die tastatur so lohnenswert ? is ja nimmer zeurer wie die alten G15 :9 meine Revoltec Fightboard is iwie fürn arsch..klackern die tasten keine beleuchtung....das is blöd  und Ka muckt rum manchmal,dass ich nich in dos oder so schreiben kann
 und Ka muckt rum manchmal,dass ich nich in dos oder so schreiben kann
dionysos
Enthusiast
sieht wirklich super aus!
da ich den garantieverlust nicht in kauf nehme, bleibt meine erstmal orange.
da ich den garantieverlust nicht in kauf nehme, bleibt meine erstmal orange.
Laxer
Enthusiast
Vielen DANK für die Beschreibung und die Mühe, die Du Dir gemacht hast - SUPER Arbeit!!
C
cut-killer
Guest
Sehr geiles Tut. Wenn du jetzt noch den Service dazu anbietest, hast du ziemlich sicher den ersten Auftrag 

sieht wirklich sehr gut aus! grosses lob!
F
FoXdeLuXx
Guest
echt nice!! ich bin grad dabei mir ne neue tasta zu ordern nur weiß ich nicht genau ob g15 oder refresh, eben mir gefällt das design von der refresh aber die blaue beläuchtung von der normalen g15!!
wenn ich löten könnt--würd ichs sicher machen, denn deine tutorial is n1, respekt!
wenn ich löten könnt--würd ichs sicher machen, denn deine tutorial is n1, respekt!
neonevangelion
Neuling
- Mitglied seit
- 08.09.2007
- Beiträge
- 64
sehr geil!
W@schb@er
Neuling
Meine Freundin hat in ihre G15 heißes Bier mit Zucker geschüttet als sie erkältet war , die G15 hat noch kurz geflakert und war dan aus es ging nix mehr , ich habe sie so gut es geht sauber gemacht da ich sie nicht auf bekommen habe, habe ich sie ca 1 woche trocknen lassen jetzt geht sie wieder
.Deep
Enthusiast
- Mitglied seit
- 15.10.2003
- Beiträge
- 7.441
- Ort
- NRW/Essen
- Laptop
- Predator Helios 16
- Details zu meinem Laptop
- Prozessor
- i9 13900H
- Speicher
- 64GB Kingston Impact Black XMP DDR5 6000
- Grafikprozessor
- GeForce RTX4080 12GB
- Display
- 2x LG UltraGear 27 / 24 Zoll
- SSD
- 4 TB Kingston Renegade
- Keyboard
- Razer Deathstalker V2 Pro TKL
- Mouse
- Razer DeathAdder V3 Pro
- Betriebssystem
- 11 Pro
ganz gelinde gesagt ist das BE*RUG und du stiftest ihn quasi dazu an
geh nach hause
Sicher?
Weil ein Rest bleibt immer. Ich reinige meine Platinen nur mit Isoprob°
Ist unnötig, wie erwähnt, bei guter Trocknung reicht billiges Leitungswasser -macht den Bauteilen gar nichts.
Ich arbeite in einer Firma die ICs herstellt - wir reinigen regelmäßig Bauteile unter fließendem Leitungswasser (wohlgemerkt mikrochips, die meist noch nicht mal verseigelt sind).
Das Testen danach zeigt nie probleme.
l0n
Enthusiast
- Mitglied seit
- 13.03.2005
- Beiträge
- 994
- Desktop System
- Ryzen
- Laptop
- Asus Zenbook Flip @ Arch Linux
- Details zu meinem Desktop
- Prozessor
- AMD Ryzen 5 5600X
- Mainboard
- Asus Prime B550
- Kühler
- Alpenföhn
- Speicher
- G.Skill DDR4 3000Mhz
- Grafikprozessor
- Asus ROG STRIX RX6700XT
- Display
- PHL 275E1
- SSD
- Samsung 850EVO 500GB + WD Blue NVMe 1TB
- Gehäuse
- Cooltek Antiphon
- Netzteil
- Corsair CX550M
- Keyboard
- Speedlink Izeris
- Mouse
- Logitech MX518 Anni. Edition
- Betriebssystem
- Arch Linux
- Webbrowser
- Firefox
- Internet
- ▼250 ▲25
Zum Thema G15 aufmachen:
G15 Refresh Blue LED Mod
Geht zwar um nen Mod an der G15 aber es steht drin wie sie aufgeht
hf beim Bastlen
G15 Refresh Blue LED Mod
Geht zwar um nen Mod an der G15 aber es steht drin wie sie aufgeht

hf beim Bastlen

- Mitglied seit
- 22.05.2002
- Beiträge
- 10.045
- Ort
- FichtelMountains
- Desktop System
- Dual Xeon Workstation
- Laptop
- HP ZBook G3
- Details zu meinem Desktop
- Prozessor
- 2x E5 2690v4 (24 Cores / 48 Threads)
- Mainboard
- Huananzhi X99 F8D
- Kühler
- 2x AlphaCool Mirage 5
- Speicher
- 256GB DDR4 2400 ECC Reg
- Grafikprozessor
- Zotac RTX 3080 OC 12GB
- Display
- 27" + 24"
- SSD
- 1TB NVMe
- HDD
- 2TB SATA
- Opt. Laufwerk
- keins
- Soundkarte
- Xenyx Q802 USB
- Gehäuse
- Fractal Designs Torrent
- Netzteil
- BeQuiet Dark Power 12 1kW
- Keyboard
- Razer Deathstalker Ultimate
- Mouse
- Steelseries Sensei
- Betriebssystem
- Windows 10 Workstation
nice...aber an deinen "lötkünsten" musst du noch arbeiten 

S
siM•Luxx
Guest
sieht geil aus  Danke!
 Danke!
FarscapeOne
Enthusiast
- Mitglied seit
- 28.01.2005
- Beiträge
- 1.452
@TBird: Ja ich weiß, bräuchte etwas Übung. Hatte das letzte Mal in der Ausbildung gelötet. Und das hier war das erstemal SMD. Und das schlimmste war das Display, da ich dort keine SideLEDs sonder TopLEDs hatte. Und die hab ich jetzt um 90° verdreht eingelötet.
@CyberWurm
Die Bilder sind noch mit den alten LEDs von mir. Ich hatte vorher die PLCC 3021 verbaut. Habe nun aber die im HowTo genannten und nun ist es heller wie bei der alten. Auf die Bilder kann man eh nicht gehen, denn wenn man die Belichtungszeit ändert, sieht das dan heller oder dunkler aus.
@CyberWurm
Die Bilder sind noch mit den alten LEDs von mir. Ich hatte vorher die PLCC 3021 verbaut. Habe nun aber die im HowTo genannten und nun ist es heller wie bei der alten. Auf die Bilder kann man eh nicht gehen, denn wenn man die Belichtungszeit ändert, sieht das dan heller oder dunkler aus.
chrissi1106
Mr.TestDrive
Hätte ich die Tastatur, würd ichs machen^^
Hast du aber sehr gut und sehr ausführlich gemacht!
MfG,
chrissi
Hast du aber sehr gut und sehr ausführlich gemacht!
MfG,
chrissi
Ähnliche Themen
- Antworten
- 0
- Aufrufe
- 312
- Artikel
- Antworten
- 3
- Aufrufe
- 801
[User-Review]
MSI MPG 271QRXDE QD-OLED im Lesertest
- Antworten
- 6
- Aufrufe
- 593


